Malware analysis is a tricky process. Incorrect handling leads to accidental self-exposure, which can be devastating depending on where the infection occurs.
- If it’s inside on your daily use machine, you are doomed and have no choice but to wipe it clean and restart.
- If it’s inside a virtual machine, you probably think that you have nothing to worry about, but what about the VM’s network capabilities? Is it connected to the same network as the host that houses the VM? If so, you are prone to lateral movement coming from the infected VM.
- What if we move the malware to a network that’s not adjacent? You can, but how are you connecting to this endpoint? Is it with RDP? If so, then you have to worry about your clipboard being exploited.
It sounds like a never-ending cycle of things to worry about. Sure, the malware you’re investigating may not house some scary, hyper-jumping capabilities, but there is just too much to lose to accidental exposure. The last thing you want to worry about is analyzing some new ransomware pieces late at night and waking up the next morning to several alerts warning you that all your customer data has been encrypted. So what are the best practices?
Well, let’s start at square one; how are we grabbing these new samples?
Step One: Where’s Your Sample for Malware Analysis?
Say you are looking for a new sample, and it just so happens to be advertised on some forum sitting on a .onion site. Your first thought is to hop on the Tor network and download it: This is your first mistake. It’s a different ballgame when you interact with hidden services; I’m talking about attribution.
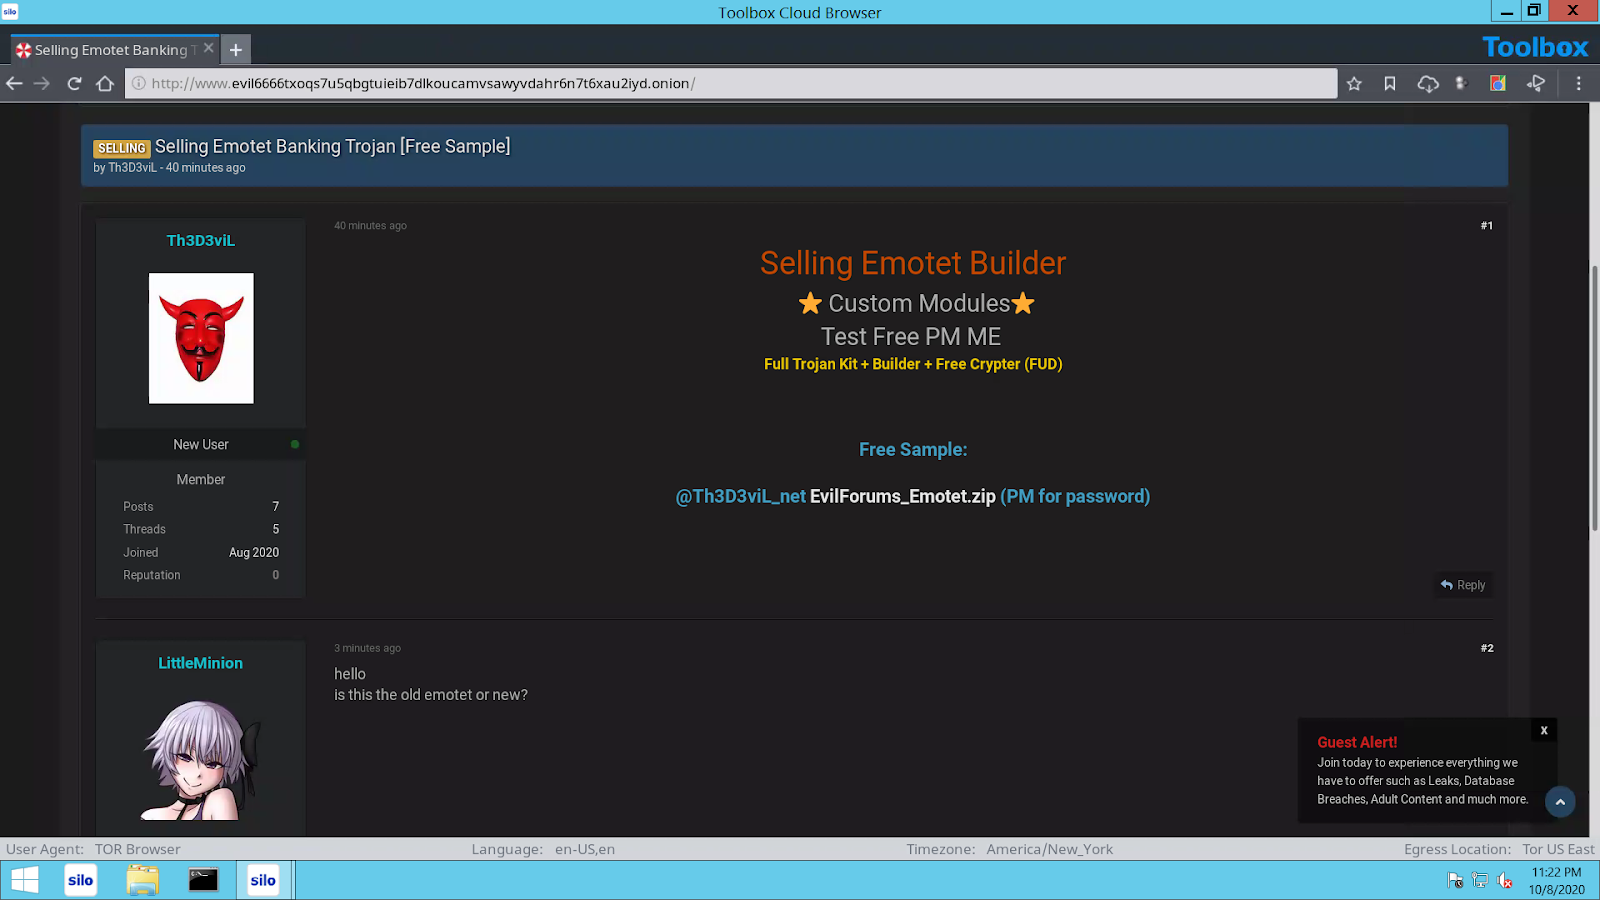
Do you look like every other Tor user? Or do you stand out? Not all Tor users use the same operating system, which is just one of many attributes that your browser is leaking. What about your timezone? Your user-agent? Your CPU type? This is just square one, and there’s so much to worry about. Not to mention you’re entrusting all your security to Firefox, the only thing standing between you and an exploit kit from breaking into your machine. These small things can be overlooked in moments where you are limited in time (such as during incident response).
So here’s my first piece of advice: reduce attribution. Don’t go roaming in areas where you don’t look like everyone else or know much about the playing field without additional research. Any single attribute that stands out may cause some nefarious web service operators to check the access logs twice. If you stand out and scream, “Researcher attributions!” this can initiate damage control, and you risk losing your sample.
Step Two: Storing the Sample
Assuming you took precautions when grabbing your sample, how are you storing it? Did you blatantly download it into your primary machine? Nothing has executed it yet (assuming your browser didn’t do it for you), but indeed some antivirus software picked it up, no? If antivirus software did pick it up, it's safe to assume that the sample is now made public to that vendor’s sample database. And if the person who made the malware strain sees that sample again (say on VirusTotal), they will initiate damage control, and you are back at square one. You probably think that perhaps you should turn off all protections so that the sample is not sent anywhere —doesn’t that sound like a great idea! If you turn off your protections, you risk accidental exposure, and you won’t even know what hit you.
With so many nuances, where should we store the malware? I’ll tell you where not to keep it: on your local endpoint! Wherever you decide to put it, make sure it is not your downloads folder. Store it on the cloud, store it somewhere non-adjacent, keep it somewhere that you do not have to worry about double-clicking it when you are too busy moving it around.
So if there is anything we have learned so far, both the tool you use to fetch the malware and where you place it should not be adjacent to your local network.
Step Three: Analyzing the Sample
So you’ve made it this far without getting burnt, Now you start the process of taking apart the piece of malware. Static analysis techniques allow you to see the insides of the malware without running it. This method is useful if you are, for instance, trying to determine behavior and quickly get an idea of the type of data that is stored inside the malware. Maybe one of the strings is encoded, perhaps it leads to some control server; it’s all vital information to consider when conducting your analysis.
There are a lot of tools that let you do this from Ghidra, IDA Pro, etc. But one thing you’re not taking into consideration is what the malware does during runtime. What if the malware does numerous network handshakes to load the next set of instructions only during runtime? Wouldn’t you like to know? This would require you to run the malware. The problem is, you can’t do that in just any environment.
First of all, this environment cannot be a regular virtual machine because as soon as the malware detects it is inside one, it could take the necessary steps in staying dormant. There are numerous ways for a malware author to produce logic that detects if the binary resides inside a virtual machine. If your malware is tailored to you or an organization, you cannot fail the first time you do this. There could be other evasive maneuvers built in that you may not know about that can alert the author that their malware is in the process of being analyzed due to execution inside a virtual environment.
So how can we avoid this? Look into vendors like Crowdstrike and Cuckoo that offer sandbox execution, that way you don’t have to worry about all the attributes that plague your virtual environment, as there are people out there who have already done the work. No point in reinventing the wheel, especially if you can’t consider every single attribute that may help distinguish that your environment is indeed being virtualized.
Step Four: Bulk Analysis Using Silo for Research (Toolbox)
If you have made it this far, it means you have successfully analyzed your first sample, and you have a pretty good understanding of if it’s benign or not. Here’s the problem: you have more than one artifact, and the amount of time it took to get this far without making any mistakes whatsoever is problematic and time-consuming. There needs to be a better route, and there is.
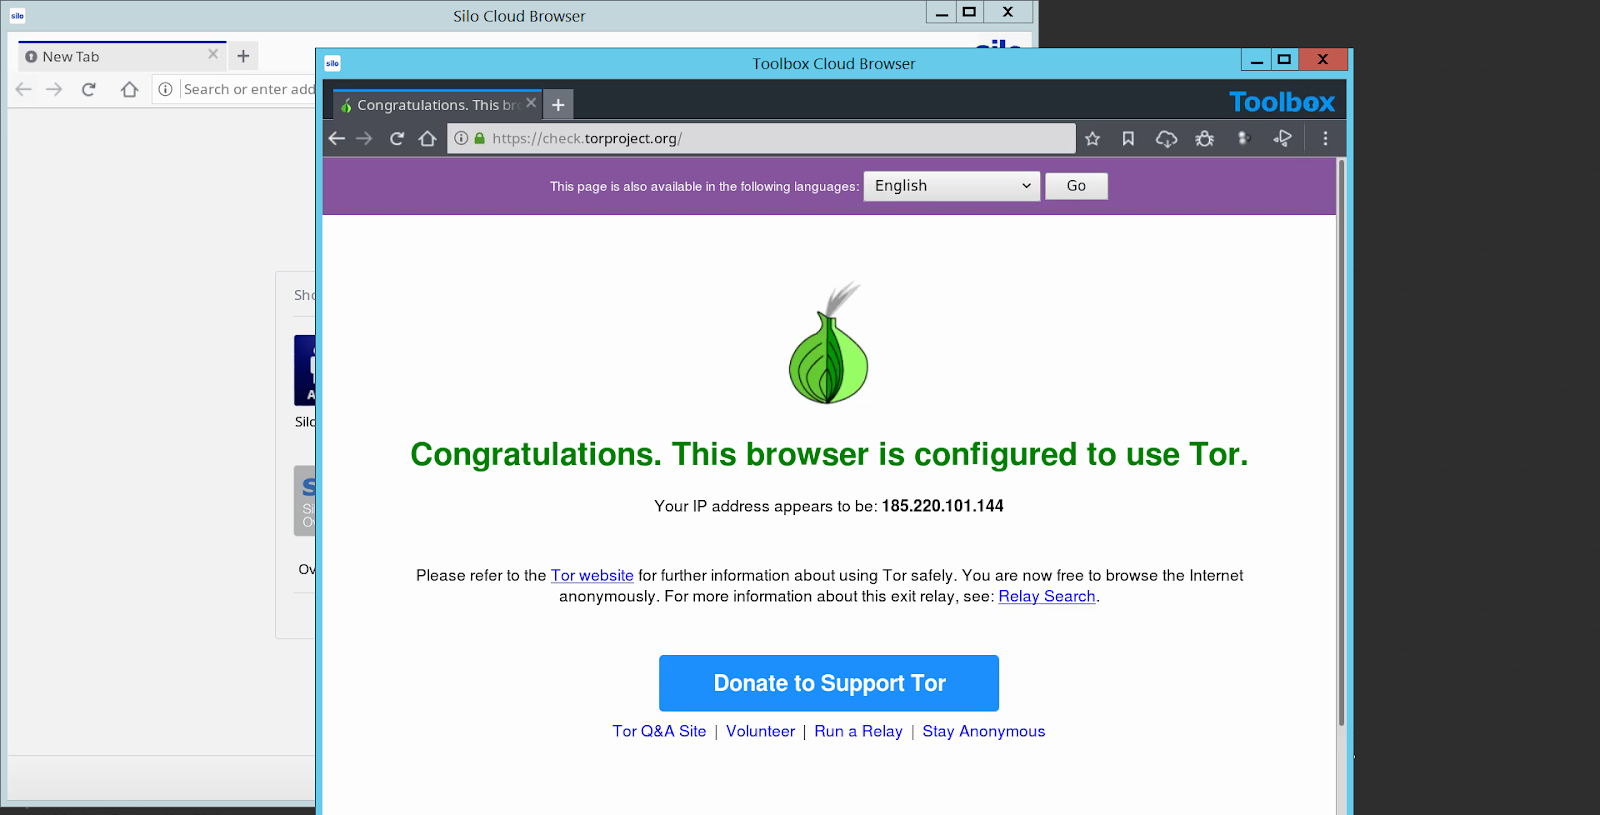
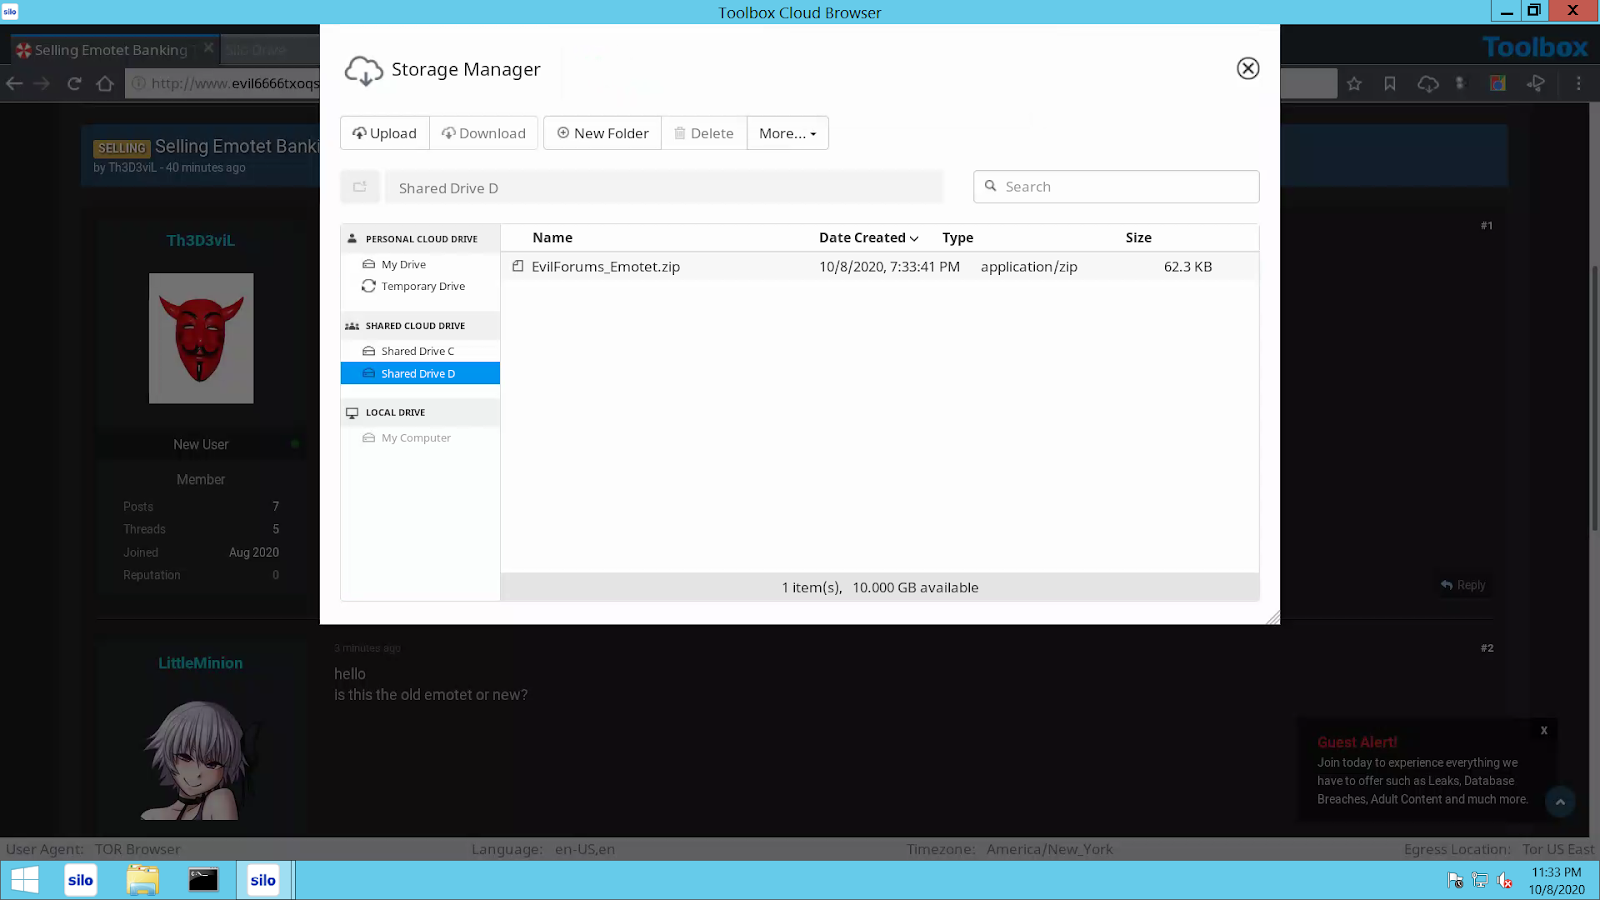
Silo for Research, a standalone browser that allows you to modify attributions, can quickly help you reduce your fingerprint. It can help you look like your garden-variety browsers, and it can also aid you in utilizing the Tor network. It also comes with a secure storage platform to keep all your artifacts in a place where accidental exposure is non-existent.
Additionally, our external API allows you to interact with the files without it ever having to leave the platform. You can create a script that goes into your storage, send it off to a sandbox and get your report back without having to make a virtual machine or go through the troubles of ensuring that nothing went wrong.
Lucky for you, a team of researchers has worked on creating a script that does just that. Let’s talk about how someone would go about building such a script.
Step Five: Building a Script
Thanks to Authentic8 secure storage APIs and outsourced malware analysis tools, transferring files from one non-adjacent network to another is quite simple. Here are the steps on how to go about building your script:
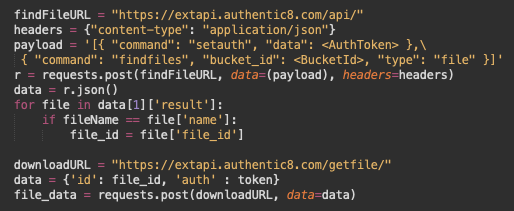
Grab your bucket file token and bucket IDs. Silo for Research allows you to access your shared secure storage drives securely via access tokens: user file tokens and storage bucket IDs. Once authenticated, you can use API endpoints to download and upload files from secure storage via HTTP requests. Additionally, there are commands to list files that allow you to iterate through a directory to find specific files. In your script, these commands will help locate and transfer files to and from secure storage and submit them to your malware analysis tool. When a file is transferred from one location to the other, make sure to transfer the files as binaries and keep them in memory. For example, if you were to write the script in python, you could use the IO library to store files in in-memory binary streams such as BytesIO objects. See more documentation here. This keeps you safe from storing any malware on your host computer and accidentally triggering an unwanted virus. The next step is to find a malware analysis tool.
To help, we’ve provided an example of doing this with the Authentic8 External API.
Pick a malware analysis tool. To make things easier, choose a tool with an easy-to-use API that allows you to upload and scan files and access the finished reports. For example, suppose we were to design our script to interact with the VirusTotal API. In that case, we need to refer to the VirusTotal API docs to learn how the API works and indicate which API endpoints we can use to send and receive information from. After looking through the documentation and understanding how to communicate with the API, we can use the /file/report endpoint to retrieve the most recent antivirus report using a sha256 hash and the /file/scan endpoint to send files for scanning and generate an antivirus report. For VirusTotal, it’s best practice to first search for the file report before sending in the file for scanning if someone else has also submitted the same hash for analysis. This makes generating reports a little faster. Other similar analysis tools available are provided by vendors like Hybrid-Analysis, Joe Sandbox Cloud and SecondWrite.
Generate the report. The most important part of the process is generating information. Depending on how deep of an analysis you’d like to perform on the malware, APIs like VirusTotal return analysis reports in HTML that allows you to analyze the behavior of malware, find similar malware and even see network traffic it creates. You can send these reports back to your secure storage to share with other analysts or keep them locally on your computer.
Putting it together. The above demonstrates the workflow of a successful script to take and send files from secure storage to the malware analysis platform of your choice. First, retrieve the file from secure storage, then send it to the sandbox, and finally retrieve the report and send it back to your secure drive or store it in a local directory. As simple as this process may be, it’s essential to remember to transfer these files in a safe, fast and isolated fashion so that dangerous malware never touches your endpoint or network.
The best part is once you have the script built, you can do bulk malware analysis within minutes.
Say your favorite malware submission platform is VirusTotal, you can create a script that takes in all your artifacts from secure storage, submits them to VirusTotal, and you get the reports back inside another drive within secure storage. You can utilize shared drives that allow everyone within your organization to look inside and view the reports safely within the browser. It never touches your endpoint.
With these steps, you don’t have to worry about attribution, virtualization or accidental exposure, and the total malware analysis time is significantly reduced. No more wasting hours and hours configuring your virtual machine to look like a regular average Joe Windows 10 box.
Tags Phishing/malware Product info

